|
Returns
The 'Return' function allows the permitted user to return IP, CMP or Non-IP/CTM products from the investigators' site to the dedicated Warehouse, rather it was the original storage location of the goods or not...
The 'Returns' screen is accessible from the 'OPERATIONS' menu, which is restricted to Marken users only.
.png)
Depending on the Marken users’ profile, the Return operations can be created, edited or viewed.
From the main operation screen, the user can decide to display all the Return operations he's authorised to access by clicking straight on the 'Search' button.
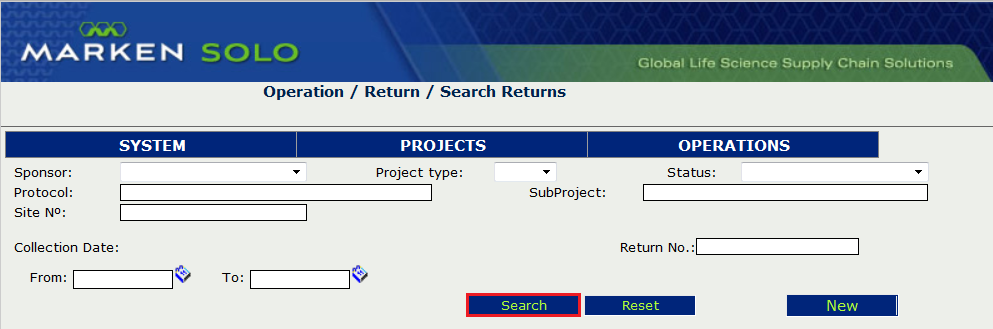
The user is also able to search for existing Return operations by applying the following filters:
ØSponsor
ØProject Type
ØStatus
ØProtocol
ØSubProject
ØSite N°
ØCollection Date (From - To)
ØReturn N°
N.B. You can click on the 'Reset' button at any time to stop the current search and wipe all the filters. After that the system will be ready for a brand new search.
In any case, you must click on the 'Search' button to display the results...
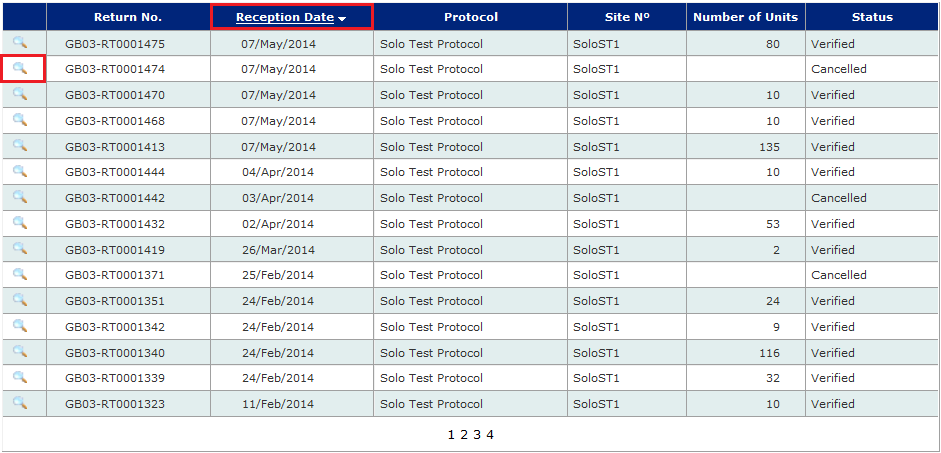
The system will display a list of results which meet the selected criteria and display the following information:
Return N°
Reception Date
Protocol
Site N°
Number of Units
Status

The user can also sort the displayed list by clicking on any of the field headers.
In order to select an item from the list to display the data relating to that Return, simply click on the magnifier glass next to the operation number.
To create a new Return, Marken operators have to select the 'New' button.
When a user creates a new return they will be prompted to enter the following information:
Customer
Protocol
Warehouse
SubProject
Reference (of the site)
Site
.png)
By clicking on the 'Next' button, the user will be prompted to complete the 'Request Data' section with the following information:
.png)
Requested By (mandatory)
Request Date (mandatory)
Request N°
Requested Collect Date
Packages
Once the 'Request Data' section has been completed, the user will have to click on the 'Save' button on the bottom of the screen to save the changes.
The operation status will then change to “Initiated".
N.B. : Solo process forces the user to move the Return operation' status from 'Initiated' (return order received) to 'Requested' (ready for the courier company to arrange the shipping), In Process (returned products received), Pre-confirmed (reconciliation completed) and then Verified (approved by a Verifier).
At this stage, the user can either decide to "Save" or "Close" the Return:
.png)
After 'Save' input the Request Data.
.png)
By clicking on the 'Request' button, the status of the operation changes to "Requested".
'Return advice' section must be entered (Book to Maestro is not active):
Hawb N° (waybill)
Collection Date
Returned by
Packages returned
Comments
Once the 'Return Advice' information has been entered the user may change the status to ‘In Process’ by clicking on the 'Process' button:
.png)
Before the Return can be Pre-confirmed, the user must enter the 'Acknowledgement of Return' information:
Received By (mandatory)
Return Date (mandatory)
Packages Received (mandatory)
Comments
Issues (tickbox)
.png)
N.B. : If the number of packages returned does not match the number of packages received then the system will alert the user and not allow them to pre-confirm the operation until they make an entry in the comments section. By the same token, if the ‘Issues’ checkbox is ticked, the system will also force the user to explain further on the issue by adding notes in the comments section.
Reconciliation Time (duration) (HH:MM): The default shown is 01:00. The Operator in charge to perform the reconciliation of the return.
Operators should count the time in hours and minutes from the start with the physical inspection from the first product to the last product up to complete the documentation related to the reconciliation of the product. If the reconciliation takes less than one hour, the Operator should place 01:00 (60 minutes) as a minimum reconciliation time.
Depending on the level of reconciliation required, the user has to select Reconciliation Level Shipper or Unit.
The user can reconcile the return just by Return Box (Shipper Level) or with specifying the details of the products returned (Unit level).
There are two modules to process a return:
.png) allows the user to select the product by Lot (without kit number) or by kit number (product set up with kit number) being despatched to the site who sent the return. allows the user to select the product by Lot (without kit number) or by kit number (product set up with kit number) being despatched to the site who sent the return.
.png) can register product that has not been shipped from this depot, e.g. Return Box. can register product that has not been shipped from this depot, e.g. Return Box.
Returning Products/Units that have been previously despatched from Solo:
.png)
If the .png) option is selected, the user will be able to select the product from a system generated list that shows all products previously despatched to the selected site if the original Despatch operation has a status of ‘Delivered’ or ‘Acknowledged’. option is selected, the user will be able to select the product from a system generated list that shows all products previously despatched to the selected site if the original Despatch operation has a status of ‘Delivered’ or ‘Acknowledged’.
Once the product is selected, the user will be able to select the Lot number from a system generated list showing the Lots (& related expiry dates) previously sent to the site:
.png)
Once a Lot is selected the system will display the Expiry date of the Lot and the user will be able to select the depot location and the number of units returned. User need to select a RTN position for the returned product..
.png)
Click on the .png) button to save the product details. button to save the product details.
.png)
The user is now able to 'Select Kit' numbers or Scan Kit numbers returned by the site.
Eventually, specify the number of doses returned in each kit.
.png)
The user is now able to scan the kit numbers returned by the site. Eventually, specify the number of doses returned in each kit.
.png)
Once units are selected the system will display the units added to the return showing:
Product Code
Description
Lot
Expiry Date
Quantity
Status
Location
Use Status
.png)
Returning Products/Units that have not been despatched by Marken ('Return' only Projects):
If the returned products have not been previously despatched from Solo, the user will be able to specify the details (product name, lot, expiry date, kit numbers) of the units returned by the site using the option.
.png)
Once the product is selected, the operator will be able to specify the Lot number and the expiry date as for a reception of new products.
The user will then be able to select the storage location and indicate the number of units returned by the site.
.png)
Click on the button to save the added product details.
The user is now able to specify the kit numbers returned by the site using the following options:
1.Add Kits
2.Add Kits By Range
3.Add Kits from Excel
4.Scan Kits (requires kit barcodes)
.png)
For further guidance on the different options to load the returned kit numbers into Solo, please refer to section of the Reception operation process description.
Once units are selected the system will display the units added to the return showing:
Product Code
Description
Lot
Expiry Date
Quantity
Status
Location
Use Status
.png)
From there, the user can either add more units to the return operation using the or options, click on the (1).png) button to only save the changes or press the button to only save the changes or press the .png) button to notify the completion of the return process and readiness for operation verification. button to notify the completion of the return process and readiness for operation verification.
.png)
The status of the operation will change from “In process” to “Pre-Confirmed”.
In case of change required, the user can 'Cancel Preconfirmation'. This allows to modify 'Acknowledgement of Return' data and the selected units.
The user needs to specify what detail has to be changed. Once return is again “In Process” status, the operator can modify it.
.png)
The "Control Data” section on the bottom of the operation screen will be updated with the name of the user that Pre-Confirmed the Return and the date of Pre-Confirmation.
.png)
The operation is now ready for the verifier user to review the operation.
N.B. As a reminder, the verifier should be a different person than the one that have pre-confirmed the operation.
If the operation is to be approved, the verifier have to select the 'Verify' button.
.png)
.png)
Click 'Ok' to confirm successful operation. Once done, the operation status will change to "Verified" and all the Return data will be locked.
.png)
.png)
For sign off actioning, a Return Report can be generated using the .png) button, when operation is in status 'Preconfirmed'. button, when operation is in status 'Preconfirmed'.
.png)
|