|
System Users
Through this option the user is allowed to create, visualize and modify the data of the users and allocate to and take out security roles from them.
When selecting this option of the menu, the system shows a screen through which it is possible to search the existing users.
It is possible to consult on a user in particular by entering the user identification and then pressing the Search button; the system presents the data of the User Name Complete Name, Country, Telephone Number and E-mail address.
In case there are no data that match the name entered, the system shows a clear screen.
.png)
The system allows for searches filtering per country: select a country from the list deployed on the screen.
Filter per head : Use the radio button to filter the user list by “Regional” head or “Local” head.
When pressing the Search button, the system will show the data of User name, Full name, Country, Telephone number and E-mail address.
In case there are no data that match the searching criteria entered, the system shows a clear screen.
The system organizes the result of the search on pages that can have and present up to 12 Users. On the lower part of the screen, the user will be able to select the desired result page.
.png)
The user can also reset the searching screen by pressing the Reset button.
.png)
Create, visualize, modify users and roles allocation
To create a new user, the Security Administrator, must select the “New”.
.png)
The system shows a screen where the data of the New User must be entered:
* User (Text, max. 100 characters) (Mandatory)
* Country (List) (Mandatory)
* Time Zone (List)(mandatory)
* Complete Name (Text, max. 100 characters) (Mandatory)
* E-mail (Text, max. 100 characters)
* Telephone Number (Text, max. 100 characters)
* Position (Text, max. 100 characters)
* Language Preference (List: English/Spanish) (Mandatory)
* Responsible [None, Local or Regional]
* Initial Password (Text, max. 100 characters) (Mandatory)
* Creation Date (Assigned by system)
* Deletion Date (Assignedby system)
* Not Assigned Roles (List)
* Assigned Roles (List)
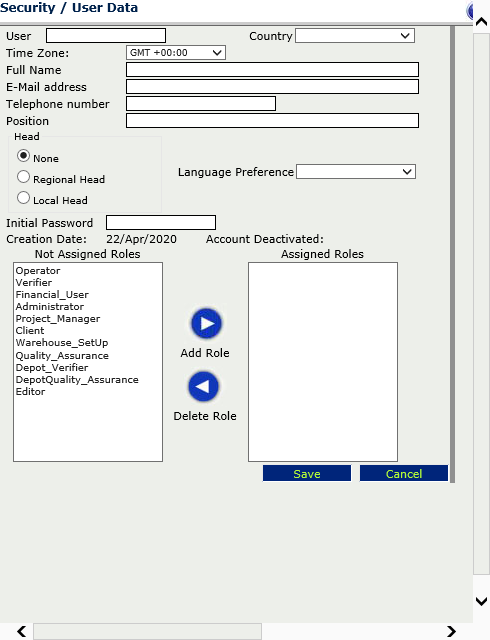
Language Preference - All user messages, field names, document and report headers will display the language preference set for the user.
The user´s time zone, country and language preference have to be selected using the dropdown boxes.
The 'Add Role' button allow the Administrator to allocate the assigned role(s) to the user.
The 'Delete Role' button allow the Administrator to remove the selected role from the user.
The field “creation date” is completed automatically once the user pressed the Save button to keep the data entered.
The system validates the mandatory fields, and requests the input of values.
Cancel button ignores the data entered and returns to the previous screen.
To visualize the information of the user by clicking on the magnifying glass.
.png)
The system shows a screen with the information of the selected User.
If the logged user is authorized, he can modify: User ID, Country, Full Name, e-mail, telephone number, position, Reference Language, Head, Original Password. In addition, he will be able to allocate or take out roles from the user.
After entering the data, press the 'Save' button to save the changes.
A user with the Administrator Role will be able to disable users of the system by pressing the Disable button. After this operation, the disabled user will not be able to enter the system again.
A printable list of all the users that match the selected filter criteria can be generated by click on the 'Print users list' button.
The users list will include the User ID, Name, Country, Telephone, Email, Account status (enabled/disabled) and Assigned roles.
The users list can be exported to PDF, World or Excel format.
.png)
.png)
Modify users and permissions by Project/ Subproject
The Administrator role will be able to set permissions for any selected user to access the existing Projects and/or Subprojects in the system.
A user with the Project Manager role can set project permissions only for the own access.
For a selected user the system shows the information on the left and on the right side of the screen the selection of the projects/subprojects that the user has been assigned to.
Access Permissions for a user are displayed in a grid
Note that if a new site is added to a SubProject, the system will automatically grant access to this site to all the users having access permission on the SubProject.
The user must press the 'Save Permissions' button located at the bottom of the project list to save the entered data.
.png)
A user will only be able to view data which relates to those projects for which they have been granted permission to access. This also applies to the options made available to the user in dropdown lists – e.g. Sponsor selection in dropdown lists – only those sponsors that relate to the users permission will be displayed.
A user, e.g. client or back up PM having a project permission will not automatically be assigned further subprojects being added later to this particular project.
When viewing the Access Permissions for a user, all projects – both open and closed – will be available for selection. The system will clearly identify which projects are ‘closed’.
The user role "Administrator" has access to all already existing and new projects by default.
To support the individual selection of a sub/project the Project Manager and Administration can use the filter/s and Search by Subproject Code, Project Code, Protocol, Warehouse, Subproject Status and Sponsor. A search requires at least 3 characters being entered.
All search results will display checked when the user already has that permission associated and unchecked if not.
.png)
The Administration user will be able to remove all associated permissions of a user with the “Delete All Permissions” button.
The Administrator role has a disable/enable button to de/activate a user.
.png)
The Administrator will be able to associate a warehouse to a user by clicking on "Warehouse Permissions" and selecting one or more warehouse/s, then "Save".
With "Save Permissions" the selected user will be assigned to all current and future subprojects of the selected warehouse/s.
Unselect the warehouse permission and "save" will keep all existing subproject associations but will prevent from automated assignments to subprojects in the future.
.png)
|